Using Pleiades images in OTB Applications and Monteverdi
The typical Pleiades product is a pansharpened image of 40 000 by 40 000 pixels large, with 4 spectral bands, but one can even order larger mosaics, whose size can be even larger, with hundreds of thousands of pixels in each dimension.
To allow easier storage and transfer of such products, the standard image file format is Jpeg2000 , which allows to achieve high compression rates. The counterpart of these better storage and transfer performances is that the performance of pixels accesses within those images may be poorer than with an image format without compression, and even more important, the cost of accessing pixels is not uniform: it depends on where are the pixels you are trying to access, and how they are spatially arranged.
To be more specific, Pleiades images are internally encoded into 2048 per 2048 pixels tiles (within the Jpeg2000 file). These tiles represent the atomic decompression unit: if you need a single pixel from a given tile, you still have to decode the whole tile to get it. As a result, if you plan to access a large amount of pixels within the image, you should try to access them on a per tile basis, because anytime you ask for a given tile more than once, the performances of your processing chains drop.
What does it mean? In Orfeo Toolbox , the streaming (on the flow) pipeline execution will try to stay synchronised with the input image tiling scheme to avoid decoding the same tile several time. But you may know that in the Orfeo Toolbox world, one can easily chain numerous processing, some them enlarging the requested region to process the output - like neighbourhood based operators for instance - or even completely change the image geometry - like ortho-rectification for instance. And this chaining freedom is also at the heart of Monteverdi . In short, it is very easy to build a processing pipeline in Orfeo Toolbox or chain of modules in Monteverdi that will get incredibly bad performances, even if the Orfeo Toolbox back-end does its best to stay in tune with tiles. And here, we do not even speak of sub-sampling the whole dataset at some point in the pipeline, which will lead to even more incredibly poor performances, and is however done anytime a viewer is called on a module output in Monteverdi .
So, can Monteverdi or OTB Applications open and process Pleiades images? Fortunately yes. Monteverdi even takes advantage of Jpeg2000 ability to generate coarser scale images for quick-look generation for visualisation purposes. But to ease the use of Pleiades images in Monteverdi , we chose to open them in a separate data type, and to lock the use of most of modules for this data type. It can only be used in the Viewer module and a dedicated module allowing to uncompress a user-defined part of a Pleiades image to disk. One can still force the data type during the opening of the image, but this is not advised: the advised way to use the other modules with Pleiades data is to first uncompress to disk your area of interest, and then open it again in Monteverdi (careful, you may need a lot of disk space to do this). As for the applications, they will work fine even on Jpeg2000 Pleiades data, but keep in mind that a performance sink might show depending on the processing you are try to achieve. Again, the advised way of working would be to uncompress your area of interest first and then work with the uncompressed file, as you used to with other data.
A final word about metadata: OTB Applications and Monteverdi can read the Dimap V2 (note that we also read the less non-official Dimap V1.1 format) metadata file associated with the Jpeg2000 file in the Pleiades product. It reads the RPC localisation model for geo-coding and the information needed to perform radiometric calibration. These metadata will be written in an associated geometry file (with a .geom extension) when uncompressing your area of interest to disk, so that both Monteverdi and OTB Applications will be able to retrieve them, even for images extracts.
Opening a Pleiades image in Monteverdi
Opening a Pleiades image in Monteverdi is not different from opening other kind of dataset: use the Open Dataset item from the File menu, and select the JP2 file corresponding to you image using the file browser.
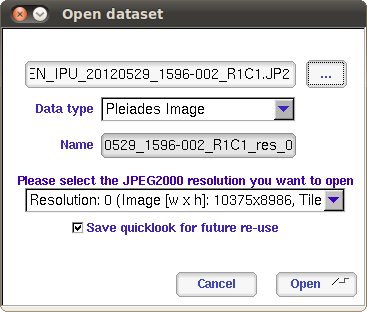
Figure 1 : Dialog window when opening a Pleiades image in Monteverdi

Figure 2 : Pleiades images in the main Monteverdi window
Figure 1 shows the dialog box when opening a Pleiades image in Monteverdi . One can see some changes with respect to the classical dialog box for images opening. The first novelty is a combo box allowing to choose the resolution of the Jpeg2000 file one wants to decode. As said in the introduction of this section, Orfeo Toolbox can take advantage of Jpeg2000 capability to access coarser resolution ver efficiently. If you select for instance the Resolution: 1 item, you will end with an image half the size of the original image with pixels twice as big. For instance, on a Pleiades panchromatic or pansharpened product, the Resolution: 0 image has a ground samping distance of 0.5 meters while the Resolution: 1 image has a ground samping distance of one meter. For a multispectral product, the Resolution: 0 image has a ground samping distance of 2 meters while the Resolution: 1 image has a ground samping distance of 4 meters.
The second novelty is a check-box called Save quicklook for future re-use. This option allows to speed-up the loading of a Pleiades image within Monteverdi . In fact, when loading a Pleiades image, Monteverdi generates a quicklook of this image to be used as a minimap in the Viewer Module as well as in the Uncompress Jpeg2000 image module. This quicklook is the coarser level of resolution from the Jpeg2000 file: it should decode easily, but can still take a while. This is why if the check-box is checked, Monteverdi will write this quicklook in uncompressed Tiff format next to the Jpeg2000 file. For instance, if the file name is:
IMG_PHR1A_MS_201204011017343_SEN_IPU_20120529_1596-002_R1C1.JP2
Monteverdi will write, if it can, the following files in the same directory:
IMG_PHR1A_MS_201204011017343_SEN_IPU_20120529_1596-002_R1C1.JP2_ql_by_otb.tif
IMG_PHR1A_MS_201204011017343_SEN_IPU_20120529_1596-002_R1C1.JP2_ql_by_otb.geom
Next time one will try to open this image in Monteverdi , the application will find these files and load directly the quicklook from them, instead of decoding it from the Jpeg2000 file, resulting in an instant loading of the image in Monteverdi . Since the wheight of these extra files is ususally of a few megaoctets, it is recommended to keep this option checked unless one has a very good reason not to. Now that the Pleiades image is loaded in Monteverdi , it appears in the main Monteverdi window, as shown in Figure 2.
Viewing a Pleiades image in Monteverdi
You can open the Pleiades image in the viewer, either by using the contextual menu or by opening the Viewer Module through the menu bar.
You can notice that the viewer opens quickly without showing the traditional progress bar. This is because Monteverdi already loaded the quick-look upon opening, and we do not need to re-compute it each time the image is opened in the Viewer Module.
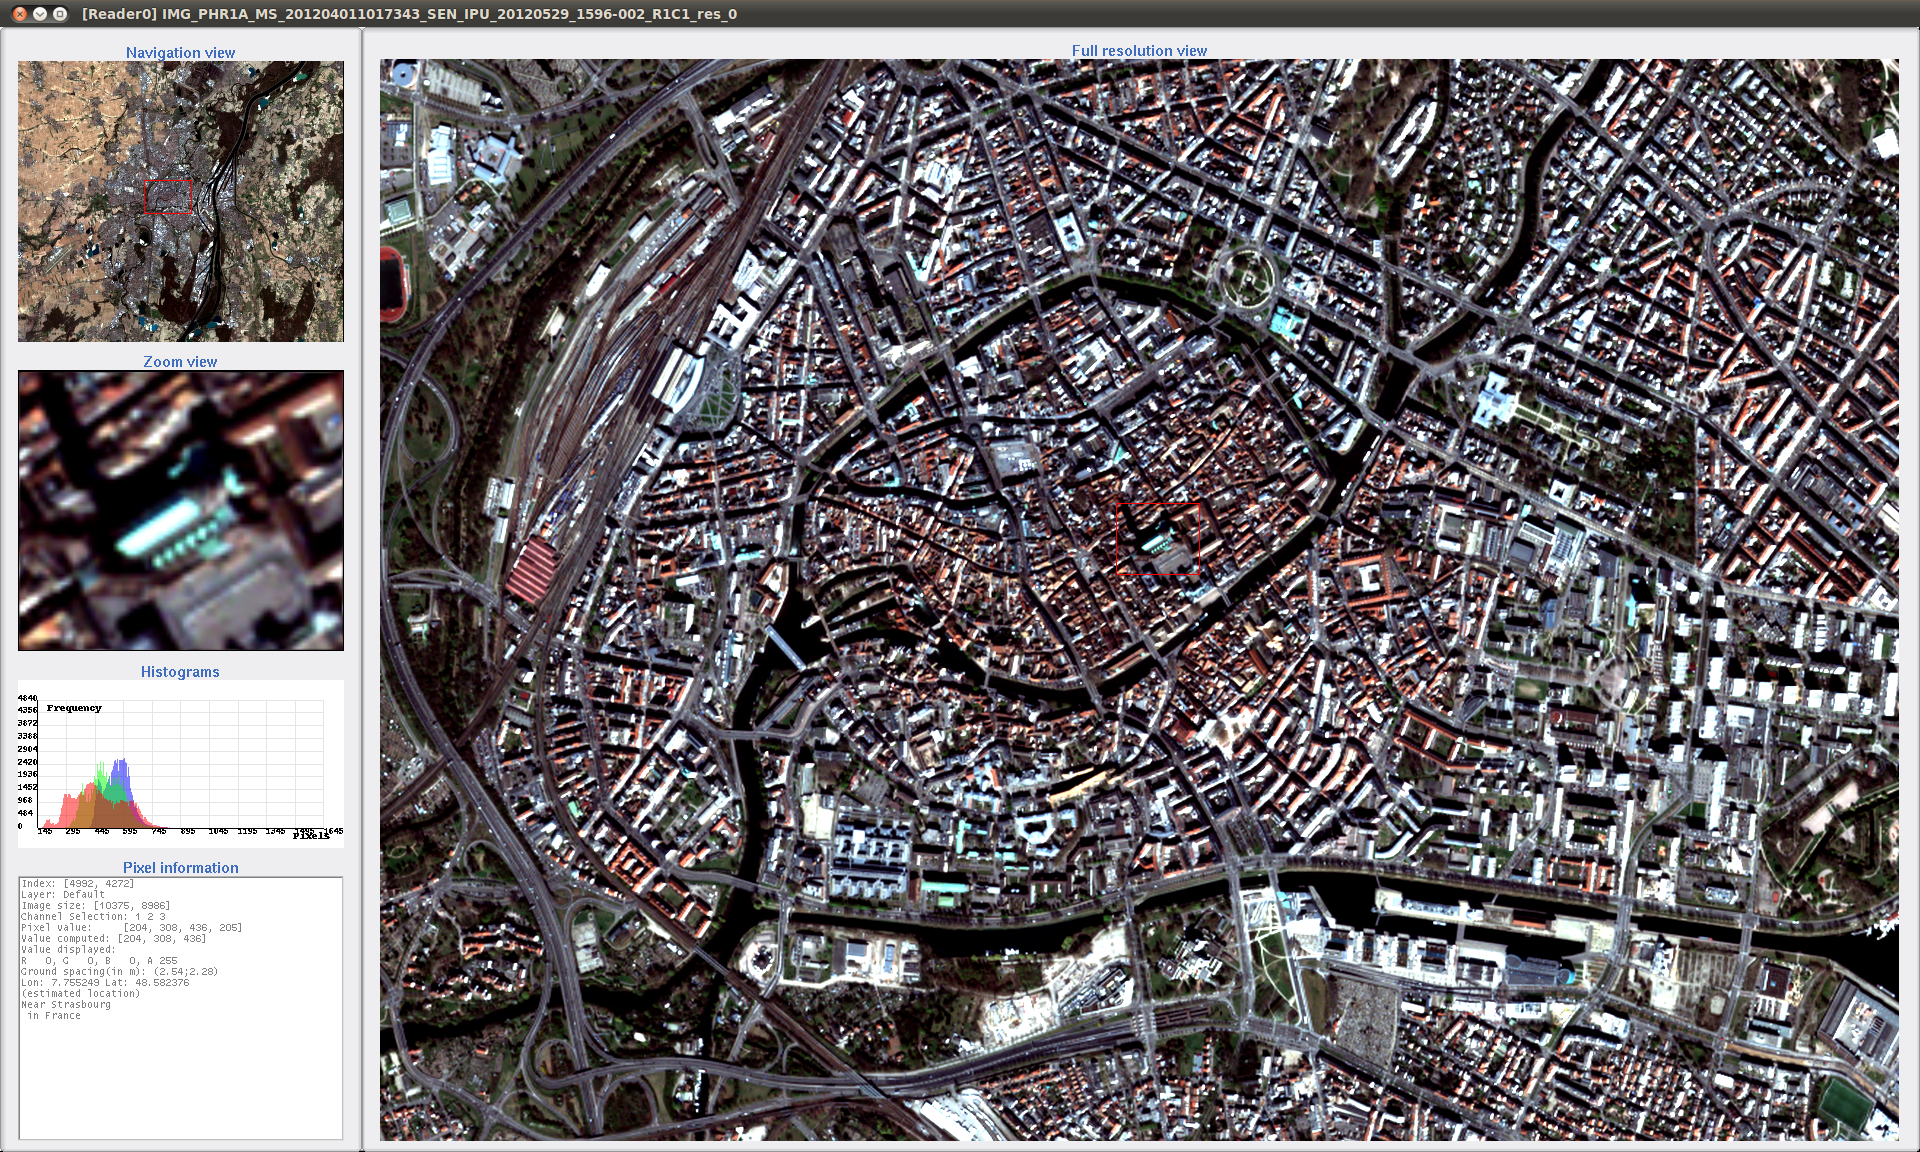
Figure 3 : A Pleiades image displayed in Monteverdi viewer. (c) CNES 2012
Figure 3 shows a Pleiades image displayed in the Viewer Module. One can notice that the navigation experience is rather smooth. If you navigate using arrows keys, you will notice that latency can occur now and then: this is due to the viewport switching to a new Jpeg2000 tile to decode. On can also observe that the latitude and longitude of the pixel under the mouse pointer is displayed, which means that the sensor modelling is handled (if you have an internet connection, you may even see the actual name of the place under mouse pointer). Last, as said in the foreword of this section, Pleiades image can be quite large, so it might be convenient to switch the viewer style from Packed to Splitted, in which case you will be able to maximize the Scroll Window for better localisation of the viewed area. To do so, one can go to the Setup tab of the Viewer Control Window.
Handling mega-tiles in Monteverdi
If the Pleiades product is very large, it might happen that the image is actually splitted into several Jpeg2000 files, also called mega-tiles. Since the area of interest might span two or more mega-tiles, it is convenient to stitch together these tiles so as to get the entire scene into one Monteverdi dataset. To do so, one must first open all mega-tiles in Monteverdi , as described in Opening a Pleiades image in Monteverdi. Once all mega-tiles are opened as shown in Figure 1
Once this is done, one can use the Mosaic Images module from the File menu. Simply append all mega-tiles into the module and run it: the module will look for the \(RiCj\) pattern to determine the mega-tiles layout, and will also check for consistency, e.g. missing tiles or mega-tiles size mismatch. Upon success, it generates a new Pleiades image dataset, which corresponding to the entire scene, as shown in Figure 4. One can then use this dataset as a regular Pleiades dataset.
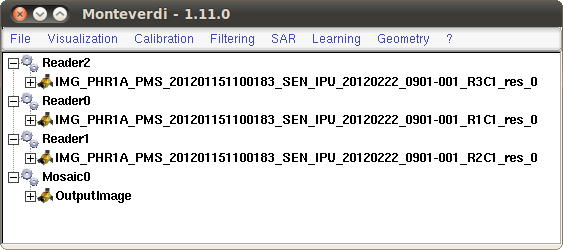
Figure 4: Pleiades mega-tiles and output mosaic in Monteverdi
Partial uncompressing of Pleiades images in Monteverdi
The next very important thing one can do with Monteverdi is to select an area of interest in the Pleiades image so as to uncompress it to disk. To do so, open the Pleiades dataset into the Uncompress Jpeg2000 image module from the File menu.
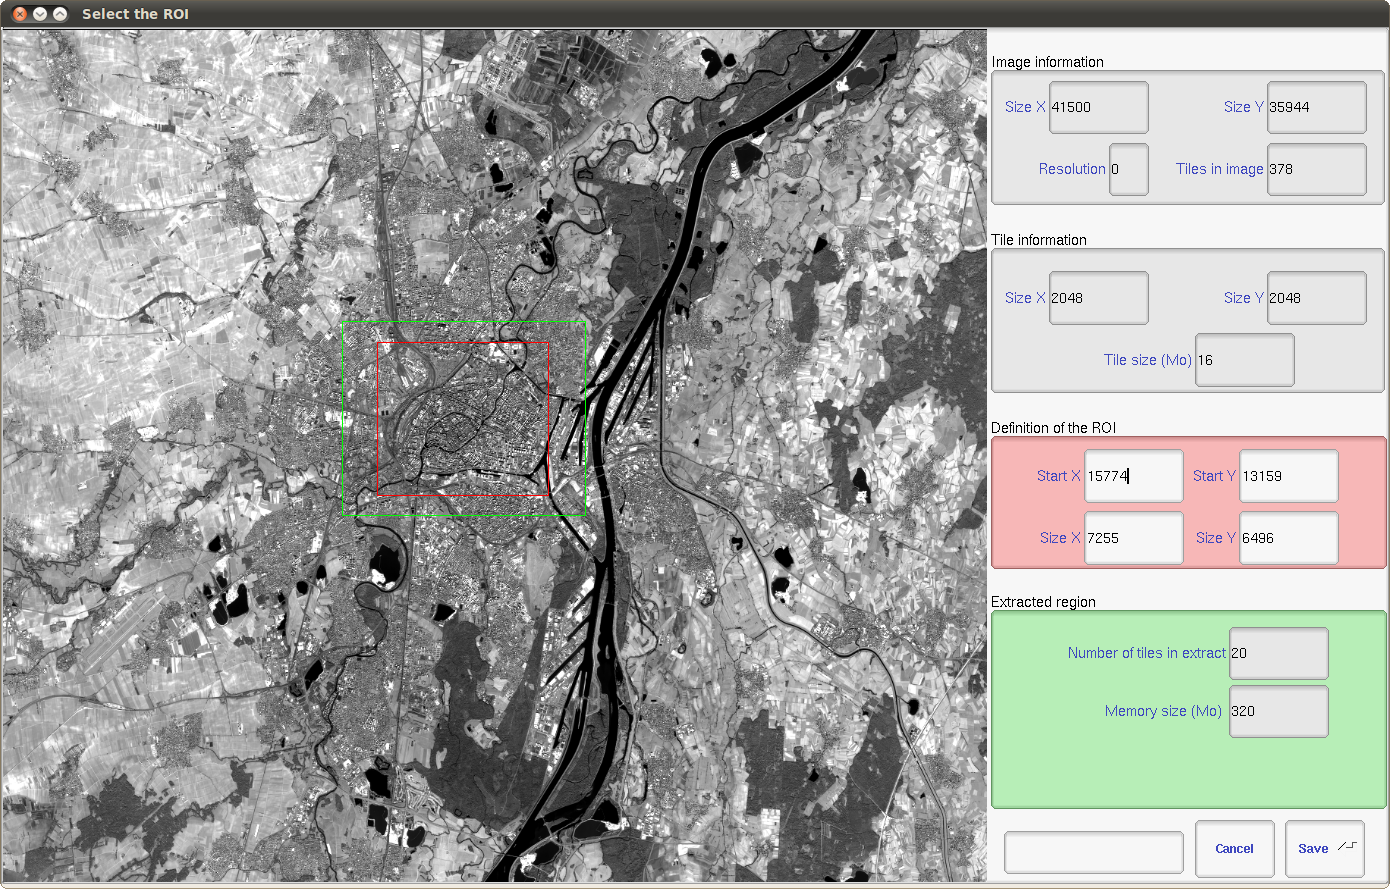
Figure 5: A Pleiades image in Monteverdi Uncompress Jpeg2000 image module. (c) CNES 2012
Figure 5 shows what this module looks like. On the left, one can find informations about the images dimensions, resolution level, and number of Jpeg2000 tiles in image, dimension of tiles, and size of tiles in mega-octets. The center part of the module is the most important one: it displays a quick-look of the Pleiades image. On this quick-look, one can select the area to be decoded by drawing a rectangle with the mouse. The red rectangle shown by the module corresponds to this user-defined area. On the left, in red, one can find the start index and size of corresponding region.
The module also displays a green rectangle, which shows the minimum set of tiles to be decoded to decode the red area: this is the region that will actually be decoded to disk. On the left, in green, one can find information about this region: how many tiles it contains, and what will be the size of the corresponding decoded output file.
Once one chose her area of interest, one can click on the Save button, and select an output file. The module will write a geometry file (with the .geom extension) with all useful metadata in it, so that when reading back the file in Monteverdi or in OTB Applications , geometry and radiometry based functionalities can still be used.
Other processing of Pleiades images with Monteverdi
For all the reasons exposed in the foreword of this section, we do not allow to use directly Pleiades images in the remaining of Monteverdi modules: the advised way of doing so is to first uncompress the area of interest to disk.
Processing of Pleiades images with OTB Applications
The OTB Applications are able to work directly with Pleiades images. However, keep in mind that performances may be limited due to the reasons exposed in the foreword of this section. If you experiment poor performances with some application, try to uncompress the area of interest from your image with Monteverdi first. One can also use the ExtractROI application for this purpose.
One thing that is interesting to know is that one can access the coarser resolution of the Jpeg2000 file by appending \(:i\) to the filename, where \(i\) is the resolution level starting at 0. For instance, one can use the following:
otbcli_ExtractROI -in IMG_PHR1A_PMS_201201151100183_SEN_IPU_20120222_0901-001_R2C1.JP2:5 -out test.tif uint16