DEMToRainbowExample.cxx
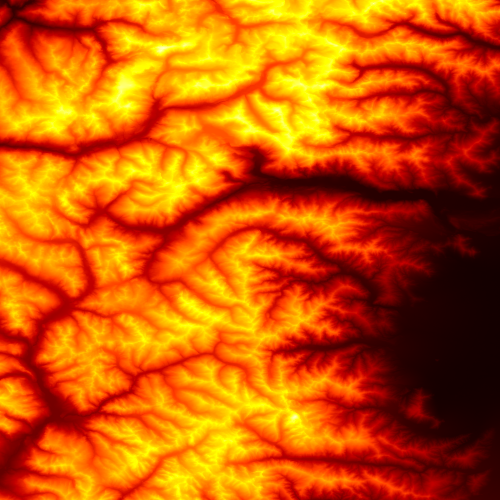
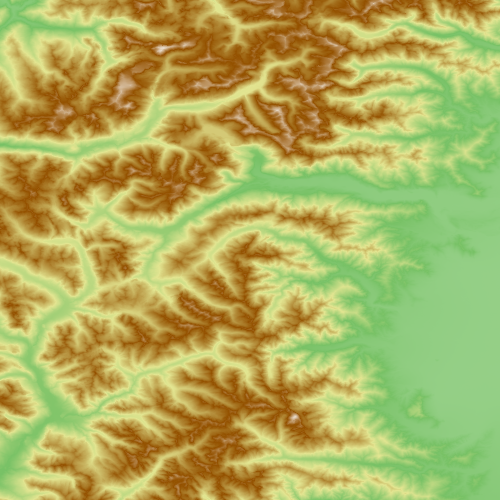
In some situation, it is desirable to represent a gray scale image in color for easier interpretation. This is particularly the case if pixel values in the image are used to represent some data such as elevation, deformation map, interferogram. In this case, it is important to ensure that similar values will get similar colors. You can notice how this requirement differs from the previous case.
The following example illustrates the use of the otb::DEMToImageGenerator class combined with the ScalarToRainbowRGBPixelFunctor. You can refer to the source code for the DEM conversion to image, we will focus on the color conversion part here.
|
|
|
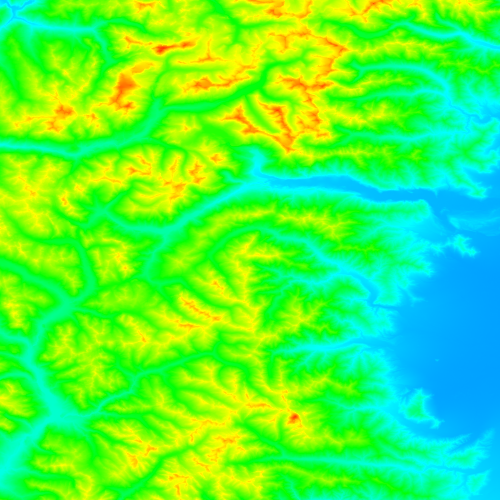
Example usage:
./DEMToRainbowExample Output/DEMToRainbowImageGenerator.png 6.5 45.5 500 500 0.002 -0.002 Input/DEM/srtm_directory_srtm
Example usage:
./DEMToRainbowExample Output/DEMToHotImageGenerator.png 6.5 45.5 500 500 0.002 -0.002 Input/DEM/srtm_directory hot
Example usage:
./DEMToRainbowExample Output/DEMToReliefImageGenerator.png 6.5 45.5 500 500 0.002 -0.002 Input/DEM/srtm_directory relief
Example source code (DEMToRainbowExample.cxx):
#include "otbImageFileReader.h"
#include "otbImageFileWriter.h"

#include "itkScalarToRGBColormapImageFilter.h"
#include "otbScalarToRainbowRGBPixelFunctor.h"
#include "otbDEMToImageGenerator.h"
#include "otbReliefColormapFunctor.h"

int main(int argc, char* argv[])
{

  if (argc < 9)
  {
    std::cout << argv[0] << " <output_filename> <Longitude Output Origin point>";
    std::cout << " <Latitude Output Origin point> <X Output Size> <Y Output size>";
    std::cout << " <X Spacing> <Y Spacing> <DEM folder path>" << std::endl;
    return EXIT_FAILURE;
  }

  using PixelType      = double;
  using UCharPixelType = unsigned char;
  using RGBPixelType   = itk::RGBPixel<UCharPixelType>;
  using ImageType      = otb::Image<PixelType, 2>;
  using RGBImageType   = otb::Image<RGBPixelType, 2>;
  using WriterType     = otb::ImageFileWriter<RGBImageType>;

  WriterType::Pointer writer = WriterType::New();
  writer->SetFileName(argv[1]);

  using DEMToImageGeneratorType = otb::DEMToImageGenerator<ImageType>;

  DEMToImageGeneratorType::Pointer demToImage = DEMToImageGeneratorType::New();

  using SizeType    = DEMToImageGeneratorType::SizeType;
  using SpacingType = DEMToImageGeneratorType::SpacingType;
  using PointType   = DEMToImageGeneratorType::PointType;

  otb::DEMHandler::GetInstance().OpenDEMDirectory(argv[8]);

  PointType origin;
  origin[0] = ::atof(argv[2]);
  origin[1] = ::atof(argv[3]);

  demToImage->SetOutputOrigin(origin);

  SizeType size;
  size[0] = ::atoi(argv[4]);
  size[1] = ::atoi(argv[5]);

  demToImage->SetOutputSize(size);

  SpacingType spacing;
  spacing[0] = ::atof(argv[6]);
  spacing[1] = ::atof(argv[7]);

  demToImage->SetOutputSpacing(spacing);

  // The ScalarToRGBColormapImageFilter is
  // the filter in charge of calling the functor we specify to do the work for
  // each pixel. Here it is the ScalarToRainbowRGBPixelFunctor.

  using ColorMapFilterType                = itk::ScalarToRGBColormapImageFilter<ImageType, RGBImageType>;
  ColorMapFilterType::Pointer colormapper = ColorMapFilterType::New();
  colormapper->UseInputImageExtremaForScalingOff();

  if (argc == 9)
  {
    using ColorMapFunctorType             = otb::Functor::ScalarToRainbowRGBPixelFunctor<PixelType, RGBPixelType>;
    ColorMapFunctorType::Pointer colormap = ColorMapFunctorType::New();
    colormap->SetMinimumInputValue(0);
    colormap->SetMaximumInputValue(4000);
    colormapper->SetColormap(colormap);
  }

  else
  {
    if (strcmp(argv[9], "hot") == 0)
    {
      using ColorMapFunctorType             = itk::Function::HotColormapFunction<PixelType, RGBPixelType>;
      ColorMapFunctorType::Pointer colormap = ColorMapFunctorType::New();
      colormap->SetMinimumInputValue(0);
      colormap->SetMaximumInputValue(4000);
      colormapper->SetColormap(colormap);
    }
    else
    {
      using ColorMapFunctorType             = otb::Functor::ReliefColormapFunctor<PixelType, RGBPixelType>;
      ColorMapFunctorType::Pointer colormap = ColorMapFunctorType::New();
      colormap->SetMinimumInputValue(0);
      colormap->SetMaximumInputValue(4000);
      colormapper->SetColormap(colormap);
    }
  }
  // And we connect the color mapper filter with the filter producing
  // the image of the DEM:

  colormapper->SetInput(demToImage->GetOutput());

  writer->SetInput(colormapper->GetOutput());

  writer->Update();
}