Figure 6.1: Collaboration diagram of the ImageIO classes.
This chapter describes the toolkit architecture supporting reading and writing of images to files. OTB does not enforce any particular file format, instead, it provides a structure inherited from ITK, supporting a variety of formats that can be easily extended by the user as new formats become available.
We begin the chapter with some simple examples of file I/O.
The source code for this example can be found in the file
Examples/IO/ImageReadWrite.cxx.
The classes responsible for reading and writing images are located at the beginning and end of the data processing pipeline. These classes are known as data sources (readers) and data sinks (writers). Generally speaking they are referred to as filters, although readers have no pipeline input and writers have no pipeline output.
The reading of images is managed by the class otb::ImageFileReader while writing is performed by the class otb::ImageFileWriter . These two classes are independent of any particular file format. The actual low level task of reading and writing specific file formats is done behind the scenes by a family of classes of type itk::ImageIO . Actually, the OTB image Readers and Writers are very similar to those of ITK, but provide new functionnalities which are specific to remote sensing images.
The first step for performing reading and writing is to include the following headers.
Then, as usual, a decision must be made about the type of pixel used to represent the image processed by the pipeline. Note that when reading and writing images, the pixel type of the image is not necessarily the same as the pixel type stored in the file. Your choice of the pixel type (and hence template parameter) should be driven mainly by two considerations:
A typical selection for remote sensing images is illustrated in the following lines.
Note that the dimension of the image in memory should match the one of the image in file. There are a couple of special cases in which this condition may be relaxed, but in general it is better to ensure that both dimensions match. This is not a real issue in remote sensing, unless you want to consider multi-band images as volumes (3D) of data.
We can now instantiate the types of the reader and writer. These two classes are parameterized over the image type.
Then, we create one object of each type using the New() method and assigning the result to a itk::SmartPointer .
The name of the file to be read or written is passed with the SetFileName() method.
We can now connect these readers and writers to filters to create a pipeline. For example, we can create a short pipeline by passing the output of the reader directly to the input of the writer.
At first view, this may seem as a quite useless program, but it is actually implementing a powerful file format conversion tool! The execution of the pipeline is triggered by the invocation of the Update() methods in one of the final objects. In this case, the final data pipeline object is the writer. It is a wise practice of defensive programming to insert any Update() call inside a try/catch block in case exceptions are thrown during the execution of the pipeline.
Note that exceptions should only be caught by pieces of code that know what to do with them. In a typical application this catch block should probably reside on the GUI code. The action on the catch block could inform the user about the failure of the IO operation.
The IO architecture of the toolkit makes it possible to avoid explicit specification of the file format used to read or write images.1 The object factory mechanism enables the ImageFileReader and ImageFileWriter to determine (at run-time) with which file format it is working with. Typically, file formats are chosen based on the filename extension, but the architecture supports arbitrarily complex processes to determine whether a file can be read or written. Alternatively, the user can specify the data file format by explicit instantiation and assignment the appropriate itk::ImageIO subclass.
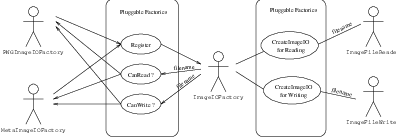
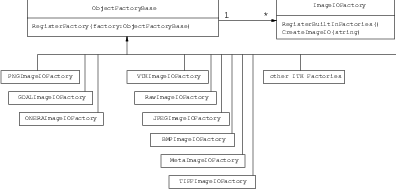
To better understand the IO architecture, please refer to Figures 6.1, 6.2, and 6.3.
The following section describes the internals of the IO architecture provided in the toolbox.
The principle behind the input/output mechanism used in ITK and therefore OTB is known as pluggable-factories [48]. This concept is illustrated in the UML diagram in Figure 6.1. From the user’s point of view the objects responsible for reading and writing files are the otb::ImageFileReader and otb::ImageFileWriter classes. These two classes, however, are not aware of the details involved in reading or writing particular file formats like PNG or GeoTIFF. What they do is to dispatch the user’s requests to a set of specific classes that are aware of the details of image file formats. These classes are the itk::ImageIO classes. The ITK delegation mechanism enables users to extend the number of supported file formats by just adding new classes to the ImageIO hierarchy.
Each instance of ImageFileReader and ImageFileWriter has a pointer to an ImageIO object. If this pointer is empty, it will be impossible to read or write an image and the image file reader/writer must determine which ImageIO class to use to perform IO operations. This is done basically by passing the filename to a centralized class, the itk::ImageIOFactory and asking it to identify any subclass of ImageIO capable of reading or writing the user-specified file. This is illustrated by the use cases on the right side of Figure 6.2. The ImageIOFactory acts here as a dispatcher that help to locate the actual IO factory classes corresponding to each file format.
Each class derived from ImageIO must provide an associated factory class capable of producing an instance of the ImageIO class. For example, for PNG files, there is a itk::PNGImageIO object that knows how to read this image files and there is a itk::PNGImageIOFactory class capable of constructing a PNGImageIO object and returning a pointer to it. Each time a new file format is added (i.e., a new ImageIO subclass is created), a factory must be implemented as a derived class of the ObjectFactoryBase class as illustrated in Figure 6.3.
For example, in order to read PNG files, a PNGImageIOFactory is created and registered with the central ImageIOFactory singleton2 class as illustrated in the left side of Figure 6.2. When the ImageFileReader asks the ImageIOFactory for an ImageIO capable of reading the file identified with filename the ImageIOFactory will iterate over the list of registered factories and will ask each one of them is they know how to read the file. The factory that responds affirmatively will be used to create the specific ImageIO instance that will be returned to the ImageFileReader and used to perform the read operations.
With respect to the ITK formats, OTB adds most of the remote sensing image formats. In order to do so, the Geospatial Data Abstraction Library, GDAL http://www.gdal.org/, is encapsultated in a ImageIO factory. GDAL is a translator library for raster geospatial data formats that is released under an X/MIT style Open Source license. As a library, it presents a single abstract data model to the calling application for all supported formats, which include CEOS, GeoTIFF, ENVI, and much more. See http://www.gdal.org/formats_list.html for the full format list.
Since GDAL is itself a multi-format library, the GDAL IO factory is able to choose the appropriate resource for reading and writing images.
In most cases the mechanism is transparent to the user who only interacts with the ImageFileReader and ImageFileWriter. It is possible, however, to explicitly select the type of ImageIO object to use. Please see the ITK Software for more details about this.
The source code for this example can be found in the file
Examples/IO/StreamingImageReadWrite.cxx.
As we have seen, the reading of images is managed by the class otb::ImageFileReader while writing is performed by the class otb::ImageFileWriter . ITK’s pipeline implements streaming. That means that a filter for which the ThreadedGenerateData method is implemented, will only produce the data for the region requested by the following filter in the pipeline. Therefore, in order to use the streaming functionality one needs to use a filter at the end of the pipeline which requests for adjacent regions of the image to be processed. In ITK, the itk::StreamingImageFilter class is used for this purpose. However, ITK does not implement streaming from/to files. This means that even if the pipeline has a small memory footprint, the images have to be stored in memory at least after the read operation and before the write operation.
OTB implements read/write streaming. For the image file reading, this is transparent for the programmer, and if a streaming loop is used at the end of the pipeline, the read operation will be streamed. For the file writing, the otb::ImageFileWriter has to be used.
The first step for performing streamed reading and writing is to include the following headers.
Then, as usual, a decision must be made about the type of pixel used to represent the image processed by the pipeline.
We can now instantiate the types of the reader and writer. These two classes are parameterized over the image type. We will rescale the intensities of the as an example of intermediate processing step.
Then, we create one object of each type using the New() method and assigning the result to a itk::SmartPointer .
The name of the file to be read or written is passed with the SetFileName() method. We also choose the range of intensities for the rescaler.
We can now connect these readers and writers to filters to create a pipeline.
We can now trigger the pipeline execution by calling the Update method on the writer.
The writer will ask its preceding filter to provide different portions of the image. Each filter in the pipeline will do the same until the request arrives to the reader. In this way, the pipeline will be executed for each requested region and the whole input image will be read, processed and written without being fully loaded in memory.
The source code for this example can be found in the file
Examples/IO/ExplicitStreamingExample.cxx.
Usually, the streaming process is hidden within the pipeline. This allows the user to get rid of the annoying task of splitting the images into tiles, and so on. However, for some kinds of processing, we do not really need a pipeline: no writer is needed, only read access to pixel values is wanted. In these cases, one has to explicitly set up the streaming procedure. Fortunately, OTB offers a high level of abstraction for this task. We will need to include the following header files:
The otb::RAMDrivenAdaptativeStreamingManager class manages the streaming approaches which are possible with the image type over which it is templated. The class itk::ImageRegionSplitter is templated over the number of dimensions of the image and will perform the actual image splitting. More information on splitter can be found in section 27.3
Once a region of the image is available, we will use classical region iterators to get the pixels.
We instantiate the image file reader, but in order to avoid reading the whole image, we call the GenerateOutputInformation() method instead of the Update() one. GenerateOutputInformation() will make available the information about sizes, band, resolutions, etc. After that, we can access the largest possible region of the input image.
We set up now the local streaming capabilities by asking the streaming traits to compute the number of regions to split the image into given the splitter, the user defined number of lines, and the input image information.
We can now get the split regions and iterate through them.
We get the region
We ask the reader to provide the region.
We declare an iterator and walk through the region.
The source code for this example can be found in the file
Examples/IO/RGBImageReadWrite.cxx.
RGB images are commonly used for representing data acquired from multispectral sensors. This example illustrates how to read and write RGB color images to and from a file. This requires the following headers as shown.
The itk::RGBPixel class is templated over the type used to represent each one of the red, green and blue components. A typical instantiation of the RGB image class might be as follows.
The image type is used as a template parameter to instantiate the reader and writer.
The filenames of the input and output files must be provided to the reader and writer respectively.
Finally, execution of the pipeline can be triggered by invoking the Update() method in the writer.
You may have noticed that apart from the declaration of the PixelType there is nothing in this code that is specific for RGB images. All the actions required to support color images are implemented internally in the itk::ImageIO objects.
The source code for this example can be found in the file
Examples/IO/ImageReadCastWrite.cxx.
Given that ITK and OTB are based on the Generic Programming paradigm, most of the types are defined at compilation time. It is sometimes important to anticipate conversion between different types of images. The following example illustrates the common case of reading an image of one pixel type and writing it on a different pixel type. This process not only involves casting but also rescaling the image intensity since the dynamic range of the input and output pixel types can be quite different. The itk::RescaleIntensityImageFilter is used here to linearly rescale the image values.
The first step in this example is to include the appropriate headers.
Then, as usual, a decision should be made about the pixel type that should be used to represent the images. Note that when reading an image, this pixel type is not necessarily the pixel type of the image stored in the file. Instead, it is the type that will be used to store the image as soon as it is read into memory.
We can now instantiate the types of the reader and writer. These two classes are parameterized over the image type.
Below we instantiate the RescaleIntensityImageFilter class that will linearly scale the image intensities.
A filter object is constructed and the minimum and maximum values of the output are selected using the SetOutputMinimum() and SetOutputMaximum() methods.
Then, we create the reader and writer and connect the pipeline.
The name of the files to be read and written are passed with the SetFileName() method.
Finally we trigger the execution of the pipeline with the Update() method on the writer. The output image will then be the scaled and cast version of the input image.
The source code for this example can be found in the file
Examples/IO/ImageReadRegionOfInterestWrite.cxx.
This example should arguably be placed in the filtering chapter. However its usefulness for typical IO operations makes it interesting to mention here. The purpose of this example is to read and image, extract a subregion and write this subregion to a file. This is a common task when we want to apply a computationally intensive method to the region of interest of an image.
As usual with OTB IO, we begin by including the appropriate header files.
The otb::ExtractROI is the filter used to extract a region from an image. Its header is included below.
Image types are defined below.
The types for the otb::ImageFileReader and otb::ImageFileWriter are instantiated using the image types.
The ExtractROI type is instantiated using the input and output pixel types. Using the pixel types as template parameters instead of the image types allows restricting the use of this class to otb::Image s which are used with scalar pixel types. See section 6.8.1 for the extraction of ROIs on otb::VectorImage s. A filter object is created with the New() method and assigned to a itk::SmartPointer .
The ExtractROI requires a region to be defined by the user. This is done by defining a rectangle with the following methods (the filter assumes that a 2D image is being processed, for N-D region extraction, you can use the itk::RegionOfInterestImageFilter class).
Below, we create the reader and writer using the New() method and assigning the result to a SmartPointer.
The name of the file to be read or written is passed with the SetFileName() method.
Below we connect the reader, filter and writer to form the data processing pipeline.
Finally we execute the pipeline by invoking Update() on the writer. The call is placed in a try/catch block in case exceptions are thrown.
Images whose pixel type is a Vector, a CovariantVector, an Array, or a Complex are quite common in image processing. One of the uses of these tye of images is the processing of SLC SAR images, which are complex.
The source code for this example can be found in the file
Examples/IO/ComplexImageReadWrite.cxx.
This example illustrates how to read and write an image of pixel type std::complex. The complex type is defined as an integral part of the C++ language.
We start by including the headers of the complex class, the image, and the reader and writer classes.
The image dimension and pixel type must be declared. In this case we use the std::complex<> as the pixel type. Using the dimension and pixel type we proceed to instantiate the image type.
The image file reader and writer types are instantiated using the image type. We can then create objects for both of them.
Filenames should be provided for both the reader and the writer. In this particular example we take those filenames from the command line arguments.
Here we simply connect the output of the reader as input to the writer. This simple program could be used for converting complex images from one fileformat to another.
The execution of this short pipeline is triggered by invoking the Update() method of the writer. This invocation must be placed inside a try/catch block since its execution may result in exceptions being thrown.
For a more interesting use of this code, you may want to add a filter in between the reader and the writer and perform any complex image to complex image operation.
The source code for this example can be found in the file
Examples/IO/MultibandImageReadWrite.cxx.
The otb::Image class with a vector pixel type could be used for representing multispectral images, with one band per vector component, however, this is not a practical way, since the dimensionality of the vector must be known at compile time. OTB offers the otb::VectorImage where the dimensionality of the vector stored for each pixel can be chosen at runtime. This is needed for the image file readers in order to dynamically set the number of bands of an image read from a file.
The OTB Readers and Writers are able to deal with otb::VectorImage s transparently for the user.
The first step for performing reading and writing is to include the following headers.
Then, as usual, a decision must be made about the type of pixel used to represent the image processed by the pipeline. The pixel type corresponds to the scalar type stored in the vector components. Therefore, for a multiband Pléiades image we will do:
We can now instantiate the types of the reader and writer. These two classes are parameterized over the image type.
Then, we create one object of each type using the New() method and assigning the result to a itk::SmartPointer .
The name of the file to be read or written is passed with the SetFileName() method.
We can now connect these readers and writers to filters to create a pipeline. The only thig to take care of is, when executing the program, choosing an output image file format which supports multiband images.
The source code for this example can be found in the file
Examples/IO/ExtractROI.cxx.
This example shows the use of the otb::MultiChannelExtractROI and otb::MultiToMonoChannelExtractROI which allow the extraction of ROIs from multiband images stored into otb::VectorImage s. The first one povides a Vector Image as output, while the second one provides a classical otb::Image with a scalar pixel type. The present example shows how to extract a ROI from a 4-band SPOT 5 image and to produce a first multi-band 3-channel image and a second mono-channel one for the SWIR band.
We start by including the needed header files.
The program arguments define the image file names as well as the rectangular area to be extracted.
As usual, we define the input and output pixel types.
First of all, we extract the multiband part by using the otb::MultiChannelExtractROI class, which is templated over the input and output pixel types. This class in not templated over the images types in order to force these images to be of otb::VectorImage type.
We create the extractor filter by using the New method of the class and we set its parameters.
We must tell the filter which are the channels to be used. When selecting contiguous bands, we can use the SetFirstChannel and the SetLastChannel. Otherwise, we select individual channels by using the SetChannel method.
We will use the OTB readers and writers for file access.
Since the number of bands of the input image is dynamically set at runtime, the UpdateOutputInformation method of the reader must be called before using the extractor filter.
We can then build the pipeline as usual.
And execute the pipeline by calling the Update method of the writer.
The usage of the otb::MultiToMonoChannelExtractROI is similar to the one of the otb::MultiChannelExtractROI described above.
The goal now is to extract an ROI from a multi-band image and generate a mono-channel image as output.
We could use the otb::MultiChannelExtractROI and select a single channel, but using the otb::MultiToMonoChannelExtractROI we generate a otb::Image instead of an otb::VectorImage . This is useful from a computing and memory usage point of view. This class is also templated over the pixel types.
For this filter, only one output channel has to be selected.
Figure 6.5 illustrates the result of the application of both extraction filters on the image presented in figure 6.4.
The source code for this example can be found in the file
Examples/IO/ImageSeriesIOExample.cxx.
This example shows how to read a list of images and concatenate them into a vector image. We will write a program which is able to perform this operation taking advantage of the streaming functionnalities of the processing pipeline. We will assume that all the input images have the same size and a single band.
The following header files will be needed:
We will start by defining the types for the input images and the associated readers.
We will use a list of image file readers in order to open all the input images at once. For this, we use the otb::ObjectList object and we template it over the type of the readers.
We will also build a list of input images in order to store the smart pointers obtained at the output of each reader. This allows us to build a pipeline without really reading the images and using lots of RAM. The otb::ImageList object will be used.
We can now loop over the input image list in order to populate the reader list and the input image list.
All the input images will be concatenated into a single output vector image. For this matter, we will use the otb::ImageListToVectorImageFilter which is templated over the input image list type and the output vector image type.
We plug the image list as input of the filter and use a otb::ImageFileWriter to write the result image to a file, so that the streaming capabilities of all the readers and the filter are used.
We can tune the size of the image tiles, so that the total memory footprint of the pipeline is constant for any execution of the program.